Home automation hubs: Tahoma, Homey Pro, Home Assistant
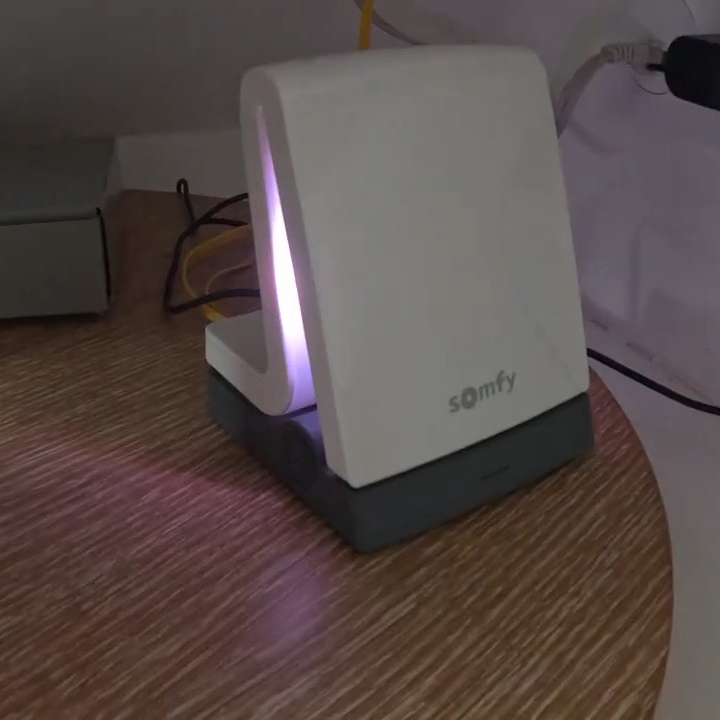
Three home automation hubs are running in my house, and not one of them replaced the previous one: the Somfy Tahoma since 2016, the Homey Pro 2023, and Home Assistant 2025 installed on a Raspberry Pi 5. Ten years of gradual additions, each one answering a need the previous hub couldn’t cover. Here’s the history, what each one actually does day to day, and which one I’d go for today.
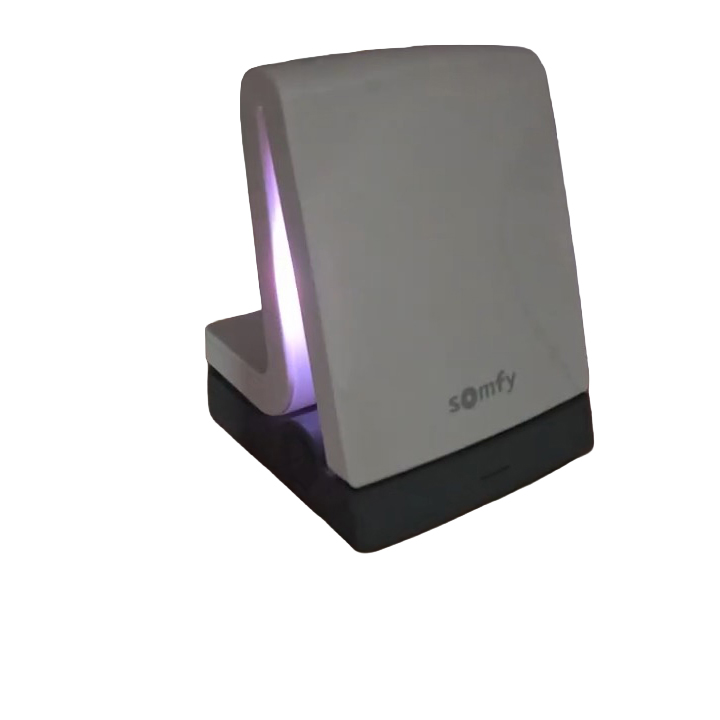 The Somfy Tahoma Serenity, in service since 2016
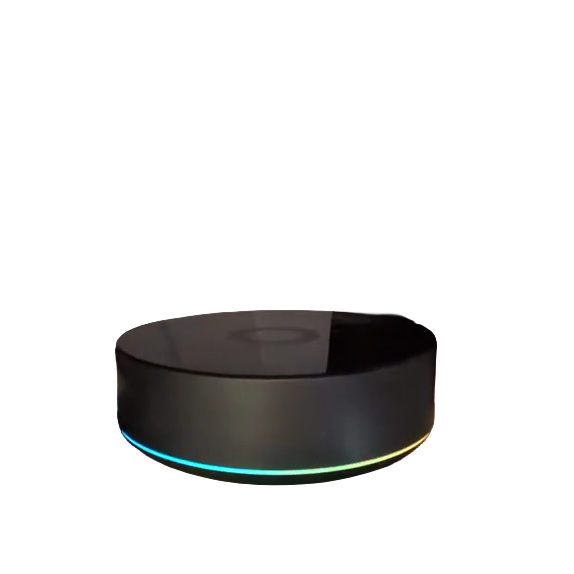 The Homey Pro 2023
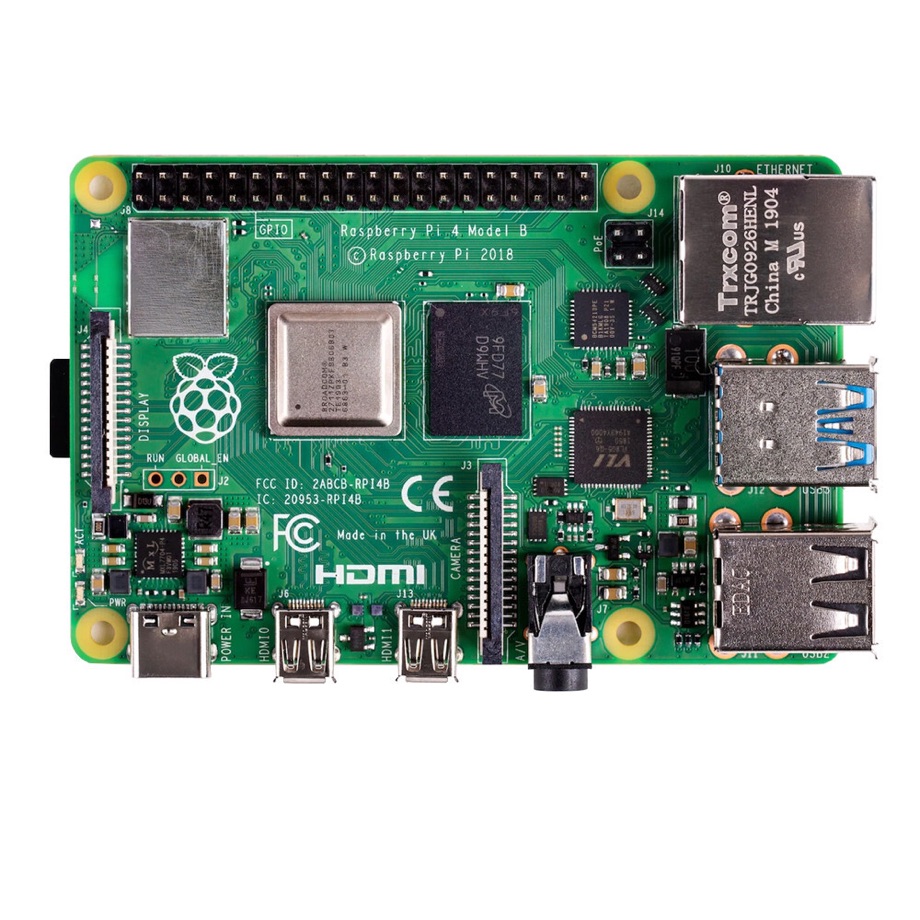 A Raspberry Pi 4; Home Assistant now runs on a Pi 5
The order matters: switch, then remote, then automation
The house was renovated in 2014 and I didn’t automate any of it at first. What mattered to me was the build itself — the materials, the spaces. Home automation, I figured, could always come later, as long as the right sockets were in the right places, particularly for the local network. That’s still my view.
When I did get started, I followed an order I still recommend: the wall switch first, then the remote, and only then automation. You don’t spend your life hunting for a remote or pulling out your phone when the switch is thirty centimetres away. And above all, when there’s a power cut or a radio problem, the remote stops working and the hub stops working — the switch keeps going.
2016: the Tahoma Serenity
All my roller shutters and blinds were already motorised with Somfy, so choosing the Tahoma was a foregone conclusion. The criticism levelled at Somfy back then — radio over their proprietary RTS protocol — never bothered me: what I wanted was something that worked and was simple to configure. Getting shutters to open in the morning and close at night doesn’t call for anything sophisticated.
The hub sits upstairs, on Ethernet, because that’s where RTS coverage reaches the most devices. What it drives:
- 17 roller shutters, each with a micromodule behind the switch;
- 13 blinds, whose Somfy motors already have the module built in — so there’s no wall switch for them, the blinds having been fitted later. In hindsight, that’s probably the mistake of the lot;
- 4 lighting micromodules: kitchen, garage, garden, terraces;
- RTS remote-controlled sockets for the pool light and the garage;
- opening sensors over IO on four doors (front door, utility room, garage, upstairs) and on the small ground-floor windows — not the patio doors, which are already protected by their shutters;
- three smoke detectors (ground floor, upstairs, garage). The garage one, 40 m from the house, doesn’t report its state reliably: that’s where the protocol reaches its limit;
- a security base with a built-in siren and notifications.
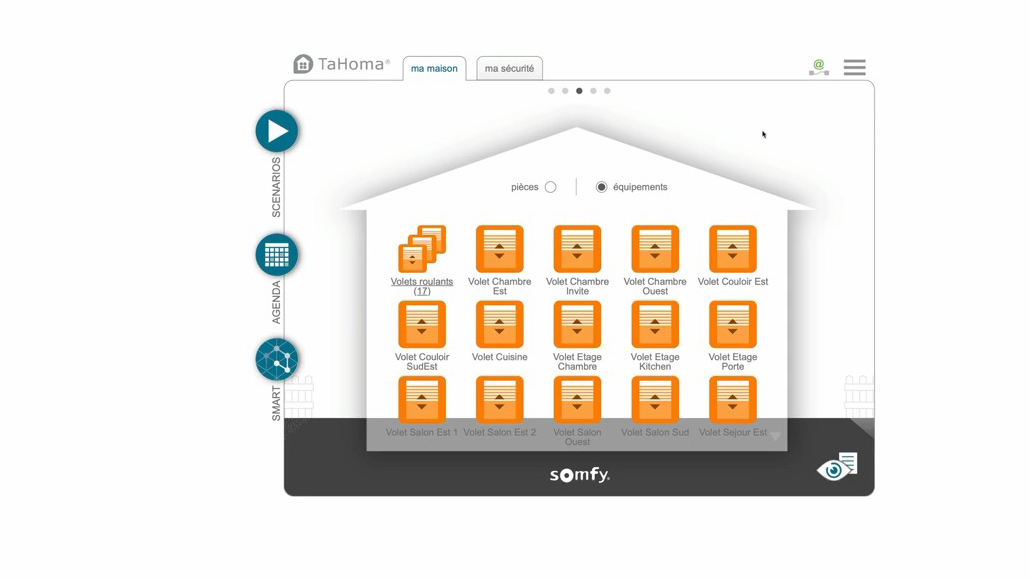
The TaHoma web interface: devices are laid out inside the house, here the roller shutters.
I’d also added IO light-level and motion sensors. I no longer use the sun sensors: they degrade in the sunlight and I never found them reliable. The motion sensors do report movement well, even if the battery indicator has never meant much.
So two protocols coexist here, and the difference matters. RTS, Somfy’s own, runs at 433 MHz and is one-way: you send a command and nothing comes back. The hub never knows a shutter’s actual state — it knows what it asked for, not what happened. IO (io-homecontrol, a standard Somfy shares with other manufacturers) is two-way and does report device state. That’s why the shutters, the blinds and the lighting micromodules are on RTS, while the opening and motion sensors — which are only worth having if they report something — are on IO.
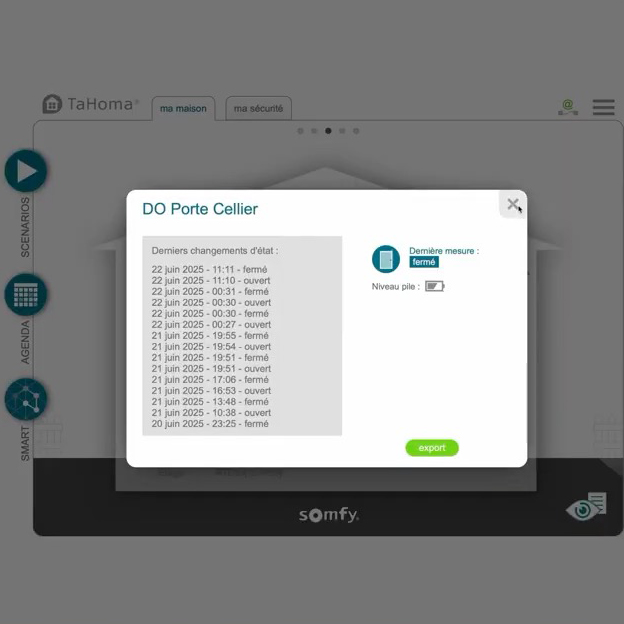
An IO opening sensor: the hub knows its current state and keeps a log of every opening and closing.
The detours: eedomus and Jeedom
Around 2018-2019 I tried something else. I bought an eedomus and kept it two or three months: I didn’t like the interface, I found it too limited. It must still be in a box in the garage somewhere. Jeedom, which I installed several times on a small computer, didn’t win me over either. That may have been the early days, and current versions are surely far better — I no longer know them, so I won’t speak ill of them.
2020: Homey, to measure things
What got me moving was wanting to measure — electricity consumption in particular. On that front the Tahoma is limited. Homey was just starting out at the time with a hub that supported several protocols, including Somfy RTS. That was my condition: no question of replacing an installation that worked perfectly well. The Somfy gear keeps running in parallel, and Homey gives me a way out if the Tahoma ever becomes obsolete.
So I added Aeotec Z-Wave modules to measure energy and power across different parts of the house, and started producing graphs I could actually compare with each other.
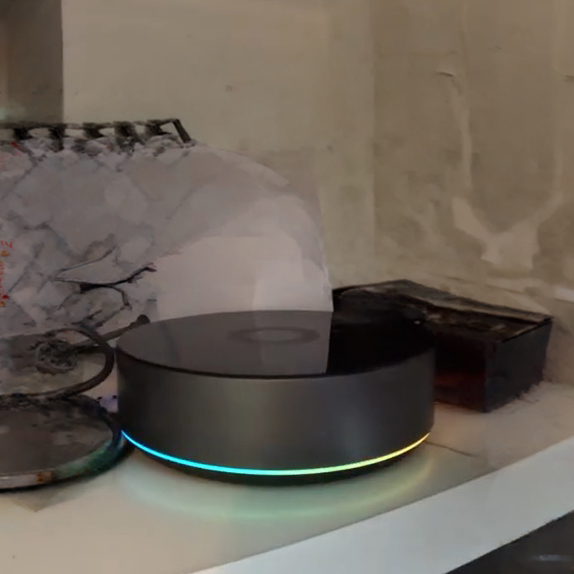
The Homey Pro 2023, which replaced the first Homey bought in 2020.
In 2023 Homey released the Pro: more powerful, with RTS + Z-Wave + Zigbee built in, no USB stick or extra module needed. The switch was easy in terms of everyday use, far less so in terms of migration — I had to rewrite almost everything. It replaced the first one. Homey has since been acquired by LG Electronics; I’m not sure what that will mean.
2025: Home Assistant on a Raspberry Pi 5
In the meantime I’d installed my solar panels and bought an electric car, and Homey’s graphs started to feel insufficient. I’d looked at Home Assistant in previous years and found it too technical for my taste. I came back to it in 2025, first on a Pi 4 then on a Raspberry Pi 5 with 4 GB, and I was genuinely impressed: it’s become stable, versions follow one another without breaking anything, and the machine is nowhere near struggling — 5 to 6 % CPU, 1.3 GB of RAM used out of 4, with a lot of integrations already in place.
I keep an eye on those figures with Glances, a monitoring tool I added from HACS. It continuously reports CPU load, memory, disks, network and the containers running on the Raspberry Pi. That’s how I confirmed the machine was absorbing the growing pile of apps and integrations without strain — and it runs for weeks on end without a reboot.
The Pi sits in the rack, right next to the Roon music server — two small, unobtrusive machines running continuously, each minding its own business.
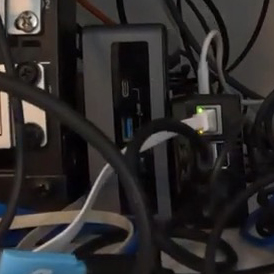
The Raspberry Pi 5 in place in the rack.
What I mainly ask of it:
- the interface to the Tahoma (via the Overkiz integration), which lets me send commands and keep my RTS setup untouched;
- Z-Wave, and Matter/Thread compatibility — still early days, we’ll see;
- Shelly modules over Wifi, which integrate very simply indeed;
- the Enphase Envoy, for everything solar — that’s the most important part;
- my Davis weather station via WeatherLink, my air quality sensors, a webcam.
With a Nabu Casa subscription, I get all of it identically from outside the house.
The Tahoma day to day: simple, and often enough
The web interface groups devices by type, each with up, down and an intermediate “my” position. Alongside that, three tools:
- Scenarios. You drag devices into a scenario and choose their state — on, off, on for 5 minutes. It’s visual, and needs no technical skill at all. Mine are deliberately simple: at sunrise, open the ground-floor shutters, or the upstairs ones, or all of them.
- The schedule, with home and away modes, so the shutters don’t operate when nobody’s there — or, conversely, so a few of them move to keep up appearances. You can define date ranges and treat weekdays differently from weekends.
- Smart detection, which triggers an action on an event: between 1:00 and 5:40, if one sensor (or all of them) fires, arm the security system, send an email, close the shutters, sound an outdoor siren.
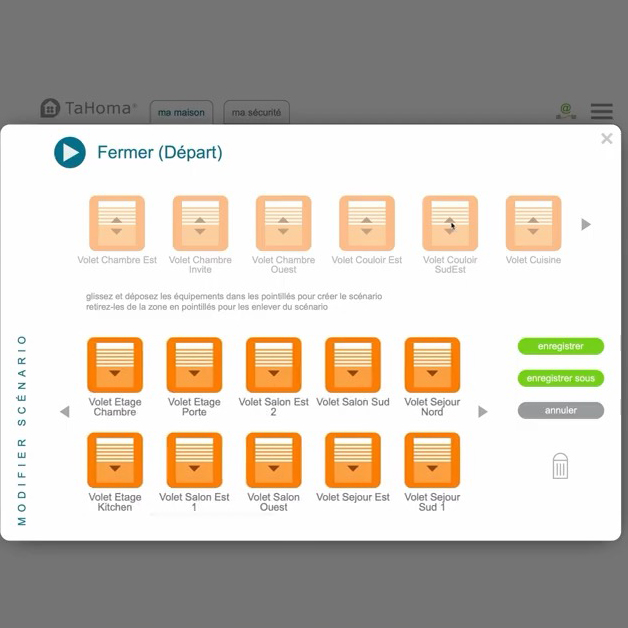 Building a scenario: you drag devices into the dotted area
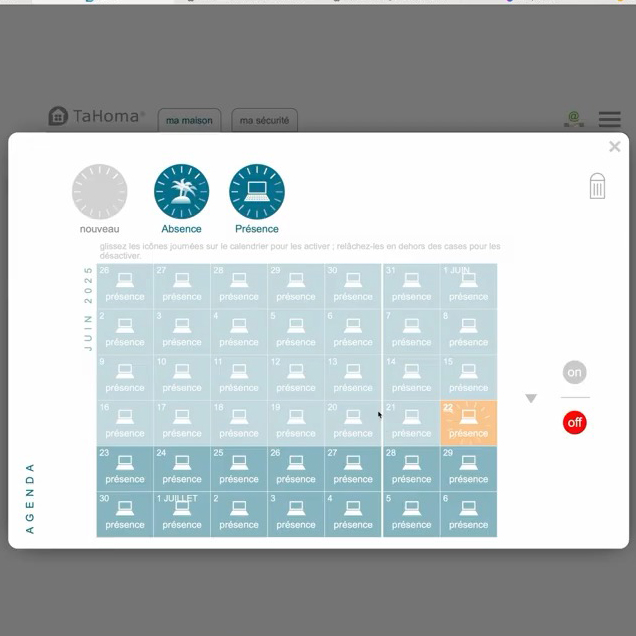 The schedule, where each day is set to home or away
At the bottom of the screen, a timeline recaps what has happened and what is about to: this morning’s automatic 6:16 opening, last night’s 23:16 closing, and the commands I sent by hand from the iPhone.
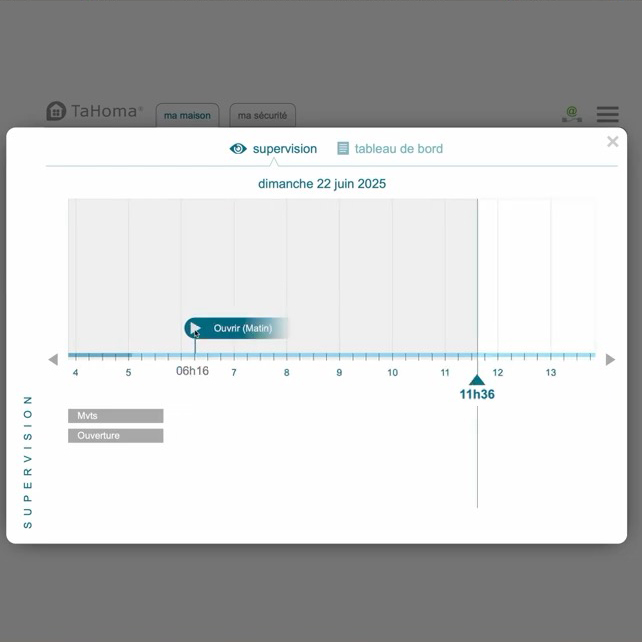 The supervision view: the "Open (Morning)" scenario fired at 6:16
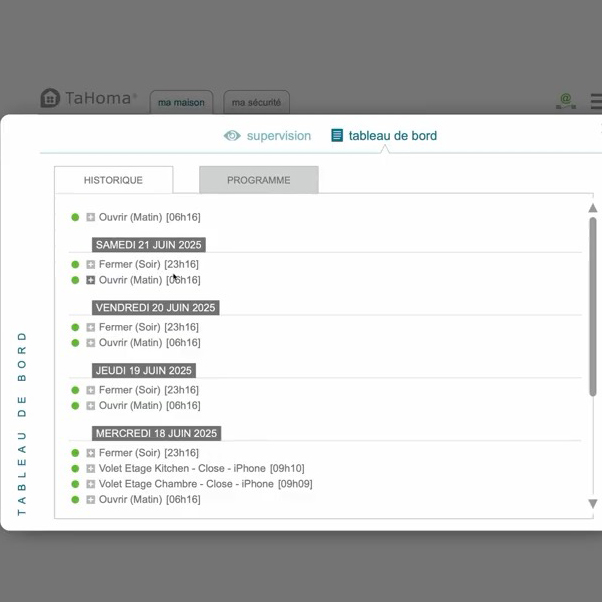 The day-by-day history, where manual commands show where they came from
The iOS app is an exact copy of the web interface, with one exception: you can’t add a device from the phone, you have to go through the web.
The Tahoma I own is no longer sold. Somfy replaces it with the Tahoma Switch, under €200, which drops Ethernet for Wifi but keeps IO and RTS (200 IO devices, 50 RTS, 50 sensors, 40 scenarios including 20 scheduled) and adds Zigbee 3.0 natively. For someone already equipped with Somfy gear and simple needs, it’s a good way in.
Homey Pro: flows and graphs
Devices are organised by zone — garage, garden, and so on — and two programming modes coexist:
- flows, classic condition-based programming, which works very well;
- advanced flows, graphical, where you move blocks around and can create variables. An example from my house: at sunrise, if I’m home, depending on the season, delay the opening or don’t, send a notification to my iPhone, then trigger the Tahoma’s “open in the morning” scenario via the integration. It’s well done, but you’re already a step up: you need some idea of what programming is.
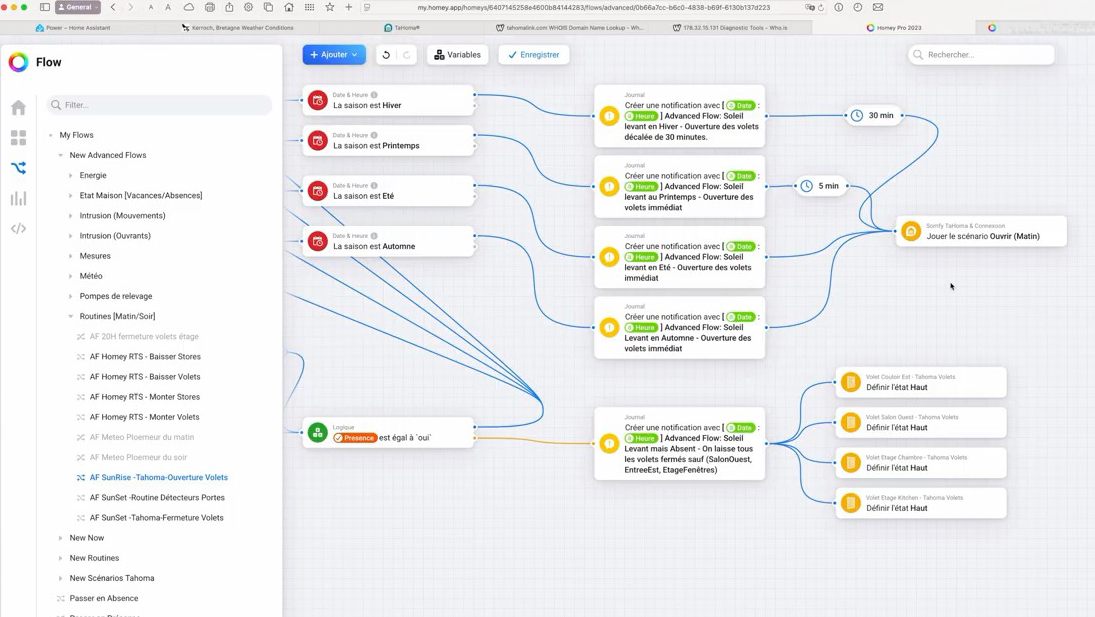
The sunrise advanced flow: the season on the left, the presence condition at the bottom, and on the right the ‘Open (Morning)’ scenario sent to the TaHoma.
Many devices go through apps installed on the hub (Fibaro, IKEA Trådfri, Somfy RTS, Somfy Tahoma…). There are considerably more of them than on the Somfy side.
As for graphs, you can overlay them, which is valuable: my solar production under my consumption, the Tesla charging, the heat pump. That’s how you immediately see that an evening spike drawn from the grid corresponds to the heat pump starting up — when it heats the water it can pull up to 6 kW, and my 3.5 kWh battery isn’t enough to absorb that.
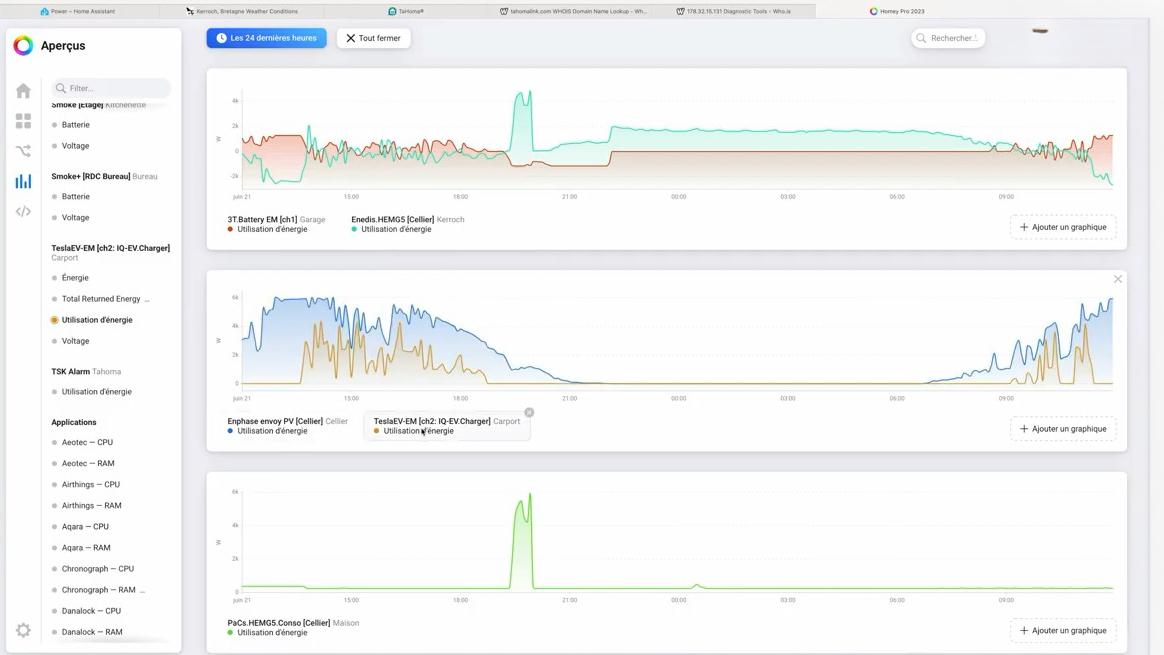
Overlaid graphs: battery and grid at the top, solar production and vehicle charging in the middle, heat pump at the bottom.
Two things irritate me about them, and they’re details that say a lot about the pace of development. There’s no way to define a default set of graphs: I have to re-select my curves every single time, even though they’ve been the same for three years. And the dashboard — the most interesting new feature, mixing values, graphs and controls — exists only in the mobile app, not on the web. Conversely, advanced flows can’t be edited on mobile, which makes rather more sense given the screen size.
Home Assistant: where I spend my days
This is the dashboard I look at most. On one screen: my solar production, what I’m exporting to or drawing from the grid, the house’s consumption, the Tesla charging, the laundry room, the heat pump, and the state of charge of the garage battery. It’s all built from cards, using the entities the integrations expose.
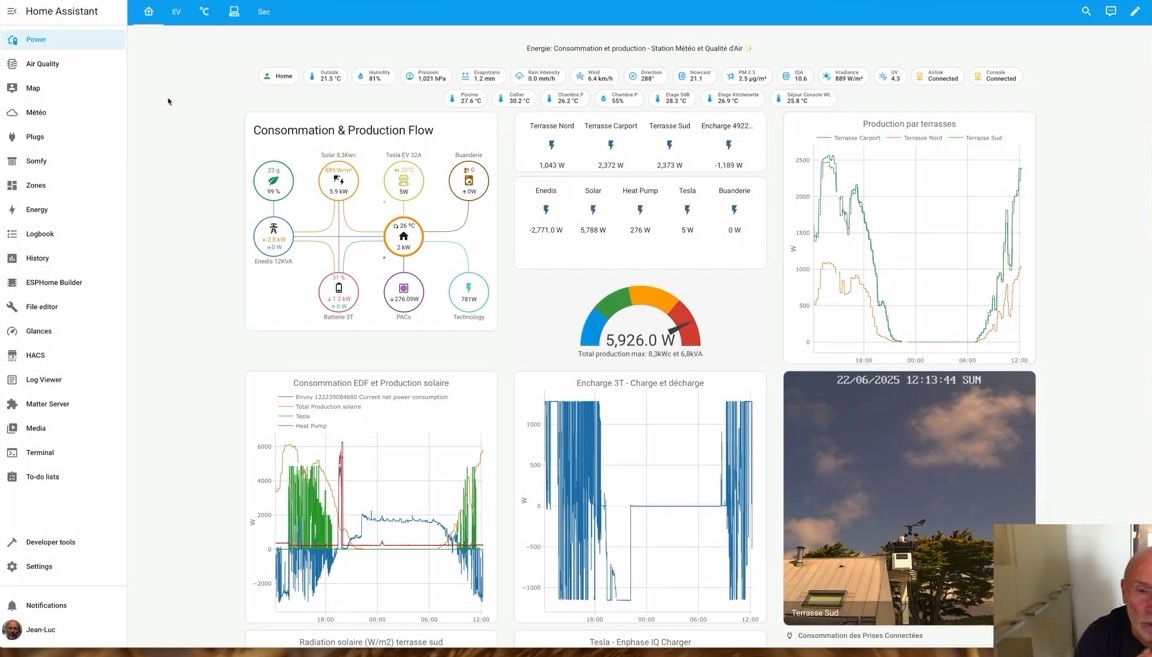
The main dashboard: the consumption/production flow on the left, production per terrace on the right, and the day’s curves below.
The Enphase integration goes right down to per-microinverter detail, and that’s what let me confirm something I suspected: my IQ8M units, rated at 330 VA, start clipping around 310 W, while the carport’s IQ8A units, rated at 360, haven’t clipped yet. My production has peaked at 6.2 kW; the theoretical maximum is 6.8, but I’ll never get there for that reason.
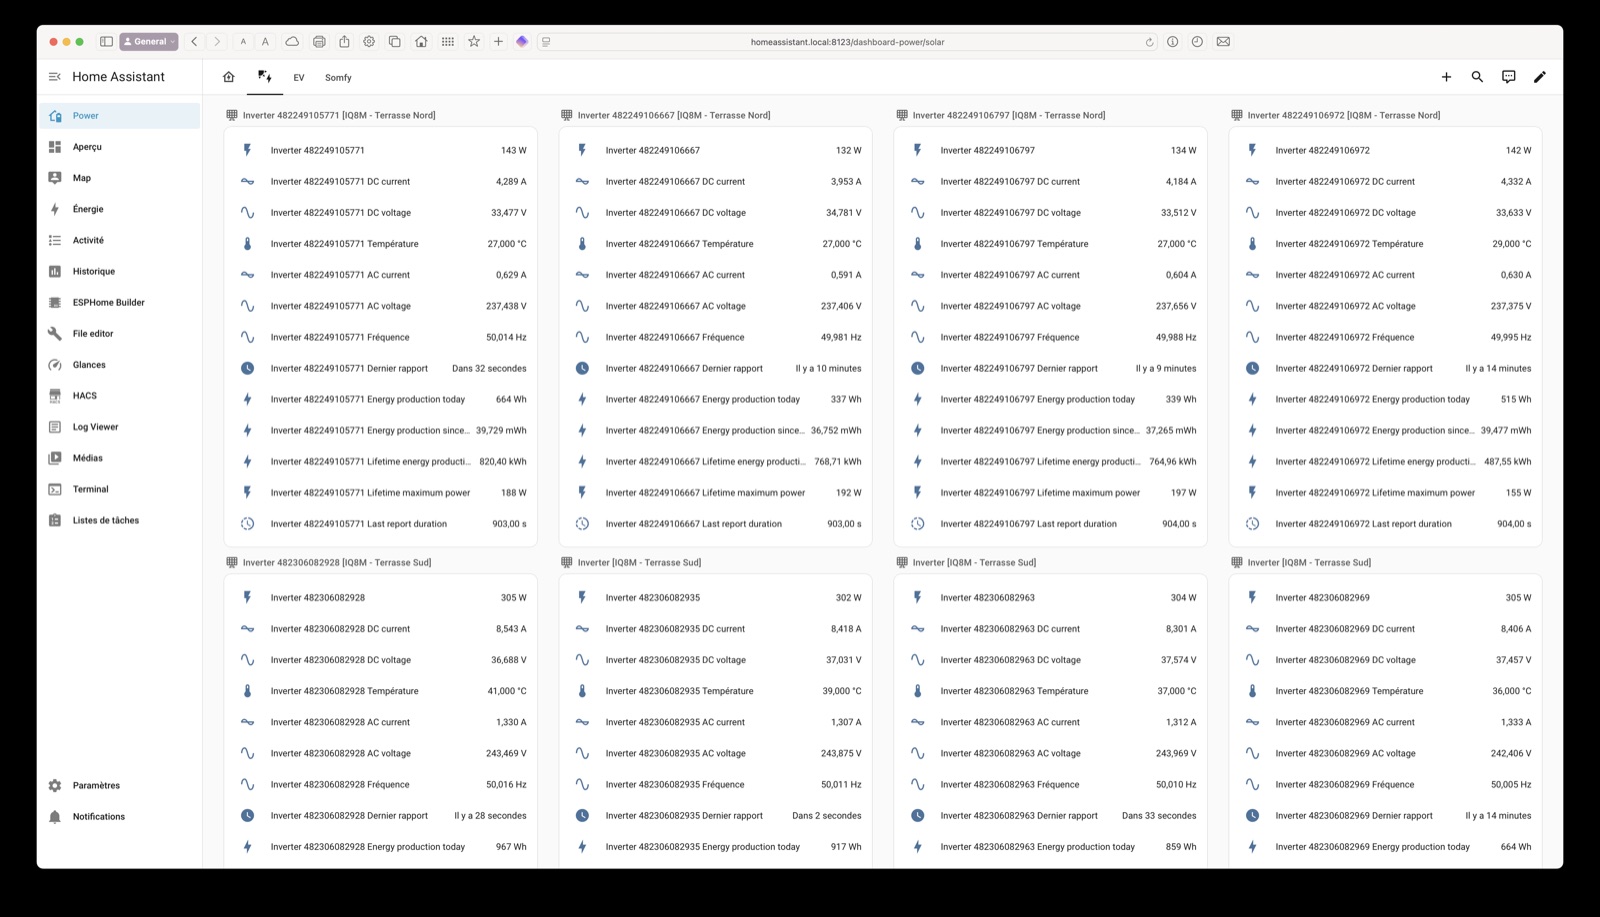
The detail the Enphase integration exposes, microinverter by microinverter: the north terrace around 140 W at the top, the south terrace above 300 W below, each with its voltage, temperature and output for the day.
Something else I watch often: the battery charging and discharging. It acts as a buffer. If I’m charging the car and switch the oven on, rather than cutting the car’s charge abruptly, the system first draws from the battery, then gradually reduces the current sent to the car. Microinverters, gateway and charger are all Enphase, so they balance among themselves. In “green charging” mode, the car only charges when there’s enough production, and the curve follows the sun all day. My system is set never to export more than 3 kW, in line with my grid declaration.
I’ve also cross-referenced the weather station data with production: at 870 W/m² of measured solar radiation yesterday, I was up at 6 kW. A panel sold as 415 or 425 Wp is rated at 1000 W/m² — at 800 you’re getting close to nominal values without reaching them.
Other, more specialised dashboards round things out: air quality (index and particulates, which I like following through the day), weather, Zigbee temperature sensors, IT consumption, security. Creating several of them is a good way to understand the tool bit by bit.
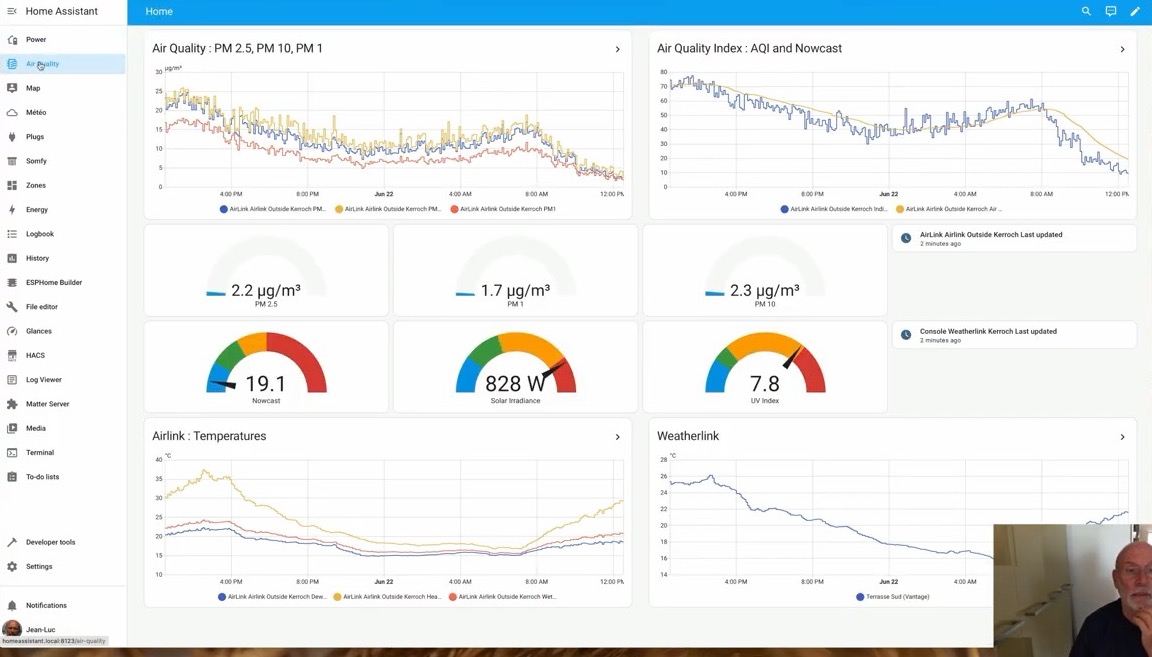
The air quality dashboard: PM1, PM2.5 and PM10 particulates, the AQI index, and the solar irradiance measured by the weather station.
Two features deserve a mention:
- Helpers. I use them a lot to rename entities:
envoy_122000means nothing to anyone,Enedisdoes. They also let you group entities to create a new one that sums them. - HACS, the repository of community-developed integrations. There are a huge number of them, and that’s where much of the customisation happens.
This is really where Home Assistant pulls away from the other two. On top of the official integrations shipped as standard — already plentiful — sits the entire community catalogue, and the gap with the Tahoma or the Homey is considerable. Weather station, air quality sensors, solar inverters, car charger, smart plugs, cameras, printers, temperature probes: in most cases the device you want to connect is already supported by somebody, and often in several different ways. That’s what ends up bringing everything into a single interface instead of juggling three apps. Glances, mentioned earlier, is one example among hundreds: nobody planned for me wanting to monitor my Raspberry Pi, but someone had already done it before me.
Auto-discovery of devices on the network works well, and the mobile app is rigorously identical to the web one: same dashboards, same tabs, same cards, right down to the settings and integrations. That’s a real advantage — you’re never lost switching from one screen to another.
Home Assistant’s weak point, and one lead
If you’re starting on Home Assistant with nothing existing, the one real drawback concerns Somfy RTS: the direct integration isn’t great. I tried the RFXtrx and didn’t find it straightforward. Two sensible options: keep a Somfy hub for RTS and drive everything else over Shelly, Zigbee or Z-Wave — or look at a project I came across recently on GitHub, Simple Somfy RTS by Robert Cools. An ESP32, a radio transmitter and a few connectors on a small board you build yourself, to send RTS commands directly from Home Assistant. It’s very clever, it costs very little, and it opens the door for anyone who might one day want to do away with the Somfy hub entirely.
On choosing modules, my view: Shelly is worth it. It works over Wifi, which is both its flaw and its strength. Its strength, because a module sitting behind a switch or a light is permanently powered: it’s always reachable, and pairing is immediate — it scans the network, finds the devices, done. Nothing like the Z-Wave or Zigbee inclusion procedures, which vary from brand to brand. Its flaw is anything battery-powered — opening sensors, for instance — where Wifi is far too power-hungry.
Ten years on
The Tahoma is still running, ten years later, with roughly one update a year. That’s slow, but the system works and does simple things very well. For someone already equipped with Somfy gear and no particular need for measurement, it’s more than enough.
The Homey Pro remains good, with plenty of apps and a well-executed graphical programming model, but with product decisions I struggle to follow — and an uncertain future since the acquisition.
Home Assistant is today the most powerful of the three, and by far the one offering the most integration possibilities. At least one update a month, a considerable community, the same interface everywhere. The trade-off is real but reasonable: building the interface I’ve just shown takes time. It isn’t especially complicated, it simply isn’t instant. You have to accept spending a few evenings assembling your cards.
What happened next
We have since sold the house, and the two hubs that ran the installation — the Somfy Tahoma and Home Assistant — went with it. It’s something you don’t necessarily think about while you’re equipping a house: a home automation setup doesn’t get dismantled when you move, it gets handed on.
Somfy has a change-of-ownership procedure for exactly this: the account attached to the hub changes holder, and the installation follows without having to start again from scratch. With Home Assistant, everything being local, it comes down to changing the user accounts — the integrations, the dashboards, the automations and the history all stay in place, and nothing in the configuration is lost.
Both transfers went through without difficulty: the equipment stayed on the wall, the accounts changed hands, and everything carried on working.
The Homey Pro, for its part, was decommissioned. Between the Tahoma handling RTS and Home Assistant doing everything else, it had become redundant: I couldn’t find anything it alone was able to do.